This is the year – the year we get organized with homeschooling, make a plan, follow a curriculum, etc. etc.
We’ve been pretty much unschooling since K was born, but this year we are planning a big move to a state with more homeschool “rules” so we have to make some adjustments and I figured it’s better to get into the groove now rather than later. Plus, K was diagnosed with autism earlier this year and really needs more consistent structure and routine in order to retain what we learn. So, this weekend, I spent a good chunk of time planning out our homeschool year.
If you’ve never planned out your homeschool lessons, it can be pretty daunting and overwhelming. So I’m sharing with you how we are structuring our months, weeks, and days!
First thing’s first, you need a GOOD PLANNER! I’ve looked and looked and most planners either just don’t provide enough space or they are for teachers in public schools. But I finally found THIS ONE that I just LOVE! It works well for one child OR multiple children. (Bonus Points for being under $10.)
It took a bit of math to figure out how to get 180 days to split up evenly through the year for our year-round schedule, but it actually works out really well!
To do year-round homeschooling, and get a full 180 days in, you can plan lessons for 3 months and take every 4th month off. For us that means we start school in September, and take December, April, and August off. So our last month of lessons for any grade level/specific curriculum is July.
This leaves roughly 15 extra “floating” no school days to scatter throughout the year for:
Holidays that don’t fall on weekends
Birthdays (K gets her whole birthday week off)
Vacations that don’t fall within the off months
Sick Days
The benefit of homeschooling here is, if you need to make up any school days, you can always do lessons on the weekend or planned off months.
Once I had the year schedule planned out, it was time to move on to planning our weekly flow. In order to do that I had to decide which subjects we would do on which days. You COULD do every subject every day, but I feel like that’s a bit much at her age and that it would cause definite overwhelm for us both.
Here’s what our weekly schedule looks like:
Daily: Since K struggles most with reading, I decided that we would focus on language arts (including spelling, phonics, writing, reading, and reading comprehension) every day – and this makes up the bulk of the daily work. I also planned one page a day from the 180 Days of Geography and 180 Days of Social Studies for First Grade workbooks, as well as ASL practice.
Mondays Only: I planned Mondays to be “slow start” days, so we do less language arts, but add in Piano and Art. This is also the day we learn new signs for ASL, which we will practice throughout the week.
Tuesday/Thursday: In addition to the daily work, we will do Math these days, with new concepts being introduced on Tuesdays and reviewed on Thursdays.
Wednesday/Friday: In addition to the daily work, we will do Science these days, with new concepts explored via videos and books on Wednesdays and lab on Fridays.
The curriculum I’m using for each subject is sequential, so we will just start at the beginning and work through to the next lesson each week. The workbooks for Geography/Social Studies are 1 page a day, and to work through the entire Math workbook, we’ll do 2 pages a week. There’s 1 ASL lesson per week, 1 new piano lesson per week, 1 Science concept per week, 1 Math concept per week… Easy Peasy!
As far as day to day flow goes, we start around 10am, take a full hour break for lunch around noon, and finish around 2pm. That allows everyone wake up at their own pace, have breakfast, and settle in. It also allows for PLENTY of frustration/meltdown time, breaks, and rabbit holes.
And there you have it! If you missed it, check out what curriculum we’re using this year HERE.
People all over the US are currently deciding whether to send their kids back to public school, enroll in virtual/distance learning programs provided by their school districts, or just cut the cord with public school altogether and dive into homeschooling.
I do not envy them – these are difficult times and difficult choices to have to make.
Fortunately for my family, we knew we wanted to homeschool even before our daughter was born. For the past 6 years I have been actively creating a lifestyle that supports our decision to homeschool (and I know I am privileged to be able to do so). My daughter has never been to public school and I do not ever intend to enroll her. We’ve been “unschooling” her since birth.
Though we technically school “year round” and started first grade work last year, in February 2021 she will reach the compulsory school age (which is 7 in our state) so we will be stepping up our structured learning even more. We’re still doing most things on a 1st grade level, as my daughter has autism and benefits from extended processing times for new material.
We started working with the Blossom and Root curriculum around this time last year and while I LOVE the curriculum, it was a little challenging for my daughter at the time. The curriculum includes a lot of reading together time, requiring the student to listen and develop story re-telling skills, which was a challenge for my daughter. In addition there is copywork and other writing required materials, which my daughter also struggled with.
This is in NO WAY a reflection on the curriculum, but rather highlighted some issues related to her autism (which was undiagnosed at the time). SO we shelved the material, pursued an autism diagnosis and have been working with her in other capacities on reading and math skills.
However, I do think this curriculum is AMAZING. It is well thought out, engaging, and has elements of both Waldorf and Charlotte Mason methodologies. It is STEM inclusive, secular, and nature based. We will be returning to this curriculum this year, albeit at a slower pace.
In particular we will be using the Math in Arts and Science portions of the curriculum. I will likely adapt the Language Arts to include the reading together time, but cut back on some of the accompanying activities, which may be harder for my child, at her current ability level. (That’s the beauty of homeschooling: meeting your child where they are and adapting as they grow!)
When Blossom and Root was too much for us last year, I looked for an online program to help us stay on task with developing the foundational skills for literacy and math. Something we struggle with in our homeschool, is my daughter’s ability to take instruction, particularly from me, and her very low frustration tolerance. In other words, she does not like to be wrong and she does not like to be corrected.
Unfortunately, that is a BIG BIG part of learning. While we were beginning to address her learning hurdles, we needed a program that removed ME as the primary source of correction/instruction and made it less “personal” (so that I could instead focus on helping her navigate frustration at the lesson material rather than frustration at me personally). Time 4 Learning helps us achieve this beautifully. In addition the lessons are presented in video format, there are practice activities, and quizzes/assessments. I can adjust the pace of the material as needed, leave out certain activities or lessons altogether if desired, have her redo assessments if she doesn’t demonstrate competency, and have report printouts of the work done.
At the 1st grade level, the program includes language arts (reading/phonics), math, science, and social studies. I personally am not a fan of the quality of the material presented in the social studies and science portions, so we do not use those. I do however highly recommend the reading/phonics and math curricula, especially if your child is a visual learner. We will continue to use this program for those two subjects for the foreseeable future.
180 Days Series – Page A Day Workbooks
I’m introducing Social Studies this year, and since we aren’t using the Time 4 Learning lessons, I invested in a few easy workbooks to help guide our explorations. Blossom and Root does cover some world culture, but these workbooks cover civics, history, and geography. There are several of these books in various subjects and they are organized by grade level. You can find them on Amazon at the links below (Amazon affiliate links).
A whole slew of Usborne Books! I’ve put some of the ones we’ve purchased over the past year on a wishlist in case you want to check them out too! I’ll update the list as we go…
Electives
We don’t do these every day, in order to avoid overwhelm, but I do feel like it’s important to include non-core subjects. For us, that is American Sign Language, Music (piano), Spanish, and Herbalism.
For ASL we use SignIt! – a video based comprehensive sign language program from the creators of Signing Time. We used Signing Time a bit two years ago and were ready to progress to a more comprehensive program.
For Spanish, we use the Complete Book of Spanish Workbook for Kids. Both my husband and I speak Spanish if not fluently, competently, so I draw on my educational background and knowledge mostly for this and use the workbook for structure. If you do not speak Spanish, then I highly recommend an immersive, video based, program like https://www.foreignlanguagesforkids.com/. (We tried Muzzy and did not like it and I feel like Duolingo is both too difficult and abstract for young learners.)
For Music we use Piano for Kids, which I REALLY love because it uses a color coded system to teach hand positioning and melodies. K loves to use this book and have her nails painted in the various colors (to match them up to the correct keys). Kids can begin playing songs right away with this book, while learning other music skills like note duration and tempo. I picked this book especially for the visual aspect and its ASD friendliness.
Herbalism will be new/not new this year. Not new because I routinely work with herbs at home and we have done some casual learning together in the form of making various teas/tinctures. She loves smelling all my herb jars, asking me what each is good for, and picking her own blends to make “potions”. However, I intend to add some structure here as well, so the way we continue our herbalism studies will be new. For this I’m looking at these 3 books:
And there you have it! It sounds like a lot, but we spend maybe 2 hours a day on schoolwork (up to 3 or 4 depending on how invested/interested we are in hands on/exploration activities) and we only do core work 4 days a week.
If you’re just diving in, I hope this gave you some ideas and resources! Remember, homeschooling is NOT public school at home. You can adjust to your schedule, your child’s needs and understanding, your child’s interests, etc. Homeschooling is an evolving process and learning can be done anywhere – not everything is learned with pencil and paper alone. 😉
Life has been extra crazy lately, and I’m not talking about the current COVID-19 Pandemic and the prolonged social distancing the US is facing right now. That’s crazy too, but since my husband and I both work from home already, and we homeschool, our day to day routines haven’t been too affected – other than not being able to attend social functions and keeping our daughter home from dance classes and playgroups.
No, my life is crazy because I am:
in the middle of a complete re-brand and moving over to an all new, professionally designed, website
developing an online course, for Pinterest management using Tailwind, under the new brand
working with a therapist in an RDI program for my daughter’s newly diagnosed Autism and implementing this at home
pushing through several MAJOR home renovations in preparation for listing our house for sale
planning a BIG 800 mile move
You know, all on top of managing the day to day work for my clients’ Pinterest accounts, living with chronic illness and navigating the “bad days” , homeschooling, and running a home. NBD, right?
All that to say, I really really really appreciate a meal that doesn’t require me to put a whole lot of effort into it. If it can be made in 30 minutes or less, it’s a keeper! Bonus points for being low carb.
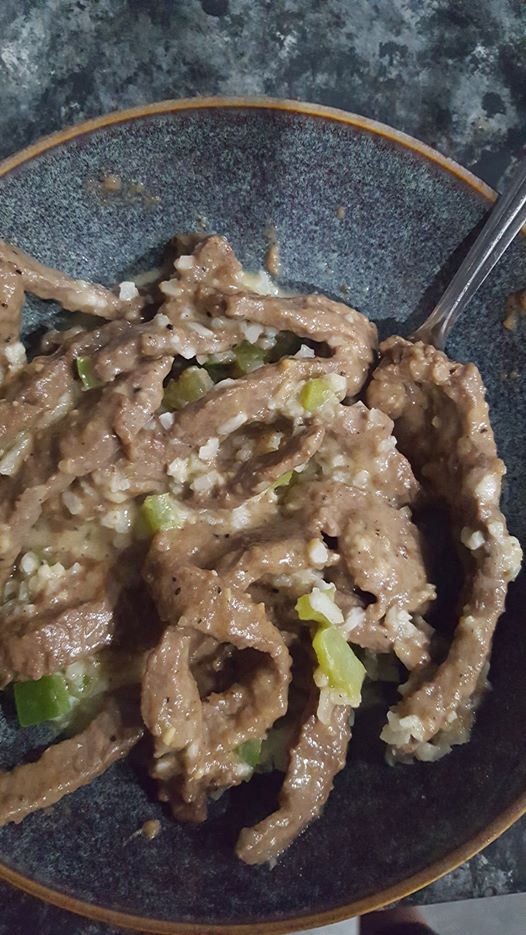
These Philly Cheesesteak bowls check all the boxes! Plus, you only need 4 main ingredients, and some common seasonings.
I’ll remind you that you won’t see much by way of measurements in my recipes. I cook intuitively – which means I wait for the spirit of my ancestors to tell me I’ve used enough seasonings!
Really, I taste as I go and adjust accordingly. I recommend you do too. Just remember you can always add MORE of something, but you can’t take it back! So start with a little and add a little more at a time as needed.
Without further ado… Philly Cheesesteak Bowls!
Ingredients:
THIN sirloin steaks OR Shredded Steak (4-6 thin steaks, they came in packs of 3 from my grocery store, or 2 packs of shredded steak)
2 Green Bell Peppers
Bag of Frozen Cauliflower Rice
Shredded Mozzarella (I used about 4 handfuls, so maybe 2 cups?)
Milk or non-dairy milk of choice (we use unsweetened Almond milk)
McCormick’s Montreal Steak seasoning (or steak rub/seasoning of choice)
Worcestershire sauce
Soy Sauce
Salt
Black Pepper
Oil (olive, coconut, canola, whatever)
INSTRUCTIONS:
If using thin sirloin steaks, cut steaks into narrow strips.
Dice peppers.
Place meat into skillet and brown, stirring frequently.
Season meat liberally with Montreal steak seasoning (or seasoning of choice) and cook through.
Add roughly equal parts Worcestershire sauce and soy sauce – Listen to your ancestors! Or, add a little at a time until it tastes good. You want there to be enough liquid to form a sauce once the cheese is melted in.
Melt in 2 handfuls of mozzarella cheese.
In a small skillet, saute peppers in oil of choice until softened (about 3 to 5 minutes)
Microwave frozen cauliflower rice for 5 minutes.
Add cauliflower rice to peppers and season with salt/black pepper.
Add a little milk to veggies and melt in 2 handfuls mozzarella cheese. Add more milk as needed.
Serve combined or over plain rice if you aren’t worried about the carbs!
You could probably do this all in the same skillet but, if you have kiddos who aren’t likely to eat the cauli rice/pepper mixture, like I do, using two skillets allows everyone to layer their own bowl however they want to.
Currently a large portion of the world is practicing “social distancing”. Many schools here in the US are closed, work places are closed, states are under shelter in place orders… it’s a crazy time! Lots of parents are home with their kids, trying to find ways to fill their time, keep little ones entertained, and keep from going completely stir crazy!
Fortunately, lots of organizations have stepped up to help provide activities and things to do, for free, to families impacted by shelter in place orders, or school/work closings. Other families who already work from home or homeschool, are providing countless resources to families who are suddenly faced with working from home and/or schooling their own children. It’s a scary and trying time for sure, but also kind of heart warming to see how people are pulling together to get through this pandemic.
In my facebook group, we are observing some unique holidays this month and I’ve put together some complementary activity ideas you can do at home! Check out the below list of holidays we will be observing and the associated suggestions for how to celebrate them at home.
And remember, even though we’re supposed to be social distancing, going outside IS OKAY (and likely necessary for your physical and mental health), just stay 6 feet away from others at all times and don’t play on any playground equipment!
1) Pop a bag of plain or lightly salted popcorn in the microwave (or use a popcorn maker!)
2) Pour popcorn into a bowl
3) Melt 1 cup of white chocolate chips, or 1/2 package of white chocolate/vanilla candy coating. (Be careful not to overheat or the chocolate will seize up! Best done on stovetop, but you can do this in the microwave in 30 second intervals, stirring well after each interval until melted.)
4) Add 4-6 drops of your favorite Unicorn-colored food coloring to the melted chocolate/candy coating and mix until well incorporated. (optional)
5) Pour over popcorn and fold in gently until evenly distributed.
6) Salt popcorn, stir gently, taste and repeat until desired saltiness is achieved.
7) Add sprinkles (optional, but highly recommended)
8) Stick bowl in the fridge for 5-10 minutes, or until coating is hardened.
9) Gently break up popcorn into clusters/pieces and enjoy!
World Art Day April 15th
Check out some art activities and project ideas HERE
Pick a famous artist and learn about them today/recreate a masterpiece
Explore art images from around the world, modern or ancient – Every country/region of the world has a different artistic flair, from the ancient Aztecs to the modern manga styles from Japan.
For more April Holiday celebration ideas – including Earth Day, Arbor Day, World Penguin Day, Tell a Story Day, etc. come join my Facebook Group(and enter our monthly contest to win a FREE BOOK from Usborne Books & More)!
This will be the second year our family has officially celebrated the winter solstice, aka Yule! I am loving the inclusion of our seasonal observances/holidays because they are untainted by commercialism and provide wonderful learning opportunities. They are also full of “hygge” (my new favorite word)!
This year we will be bringing back some of the same activities we enjoyed last year: baking a sun cake, reading a story about winter solstice, decorating our tree… but we also started a new tradition!
This year our “elf on the shelf” has been bringing a book each night to read together the following day.
We don’t do the traditional elf on the shelf thing anyway – I just don’t like the idea of the fear-based tactic of the elf always watching and reporting to Santa. In years past, our elf has simply come to visit with us, sometimes getting herself into silly situations (like stuck in the sugar jar). But we have never read the Elf on the Shelf story in this house and we never will (in fact I gave the accompanying book away this year).
K has LOVED this new tradition! it’s brought us all together at bedtime and has added quite substantially to her bookshelf! I had to raid TWO local Goodwill stores to find all 25 books – new books would be lovely but, we’re all about that frugal living (I spent less than $20 on this!) and keeping things simple. Used books are just as good and I found some really fun reads by thrifting, rather than buying from a bookstore.
We will also be celebrating Christmas later this month. Since hubby and I both grew up in Christian homes and since Christmas is such a widely celebrated holiday anyway – and is honestly more secular in society’s portrayal of it – this is a holiday we can’t really get away from.
We keep it simple, Santa only brings 3 gifts and a modest stocking. My husband and I don’t exchange gifts as we prefer to spend the money on the kids. We spend the morning together drinking tea and opening gifts, then head to my in law’s for breakfast, my grandpa’s for lunch, and end the day at hubby’s grandpa’s for dinner. We visit my parents’ on Christmas Eve. My stepson joins us for at least one day. It’s a holiday full of food and family and I personally try very very hard to keep a spirit of giving, without falling prey to an obligation to spend X amount of money on X amount of people, buy plastic junk, etc.
Yule/ Solstice is different. There are no gifts – aside from the books our elf brings. We bake, we do crafts, we read together, and we light candles and give thanks for the warmth of the sun, the turning of the seasons, and all of our myriad blessings. We reflect on the past year and let go of it. We express our hopes for the new year and welcome back the sun and the lengthening of days. This year, we’ll get together with some of our friends and bake cookies/make crafts together before circling around the fire to give thanks and share a meal together. There is no rushing from place to place, there is no pressure to buy gifts, there is nothing but a cozy (if not chaotic from all the kids!) gathering and an honoring of the Earth and her cycles.
If you are new to the Wheel of the Year, and looking for some ideas on how to celebrate Yule – check out this post {updating soon}! For our Sun Cake recipe – click here!
And if you need more ideas – visit our Yule board on Pinterest 🙂
Blessed Yule, Merry Christmas, Happy Hanukkah, Happy Diwali…. whatever you are celebrating this winter season, I hope it is filled with lots of Love and Light!
This sun cake is so easy and delicious! This cake is light and moist, and is topped with a orange cream cheese “glaze” – not a heavy frosting! Using a ROUND cake pan , yellow cake, and oranges, this cake represents the Sun and is perfect for celebrating winter solstice (return of the sun) or as a summer treat!
Ingredients:
1 box yellow cake mix PLUS the needed ingredients listed on the box (eggs/oil)
2-3 cups mandarin orange slices in juice or water (the canned kind)
1 block of cream cheese
1 cup of sugar
Cake Instructions:
Prepare cake batter as directed on box with eggs and oil, BUT DO NOT ADD WATER.
Blend 1 cup of canned mandarin oranges and add to cake batter.
Add batter to greased cake pan and bake as directed on box for pan size/type. (You may need to bake it longer, but check it at the time indicated for doneness). I use a ROUND cake pan.
Frosting Instructions:
In a microwave save bowl, melt 1 block of cream cheese in the microwave using 30 second intervals. Stir every 30 seconds until uniformly melted and creamy.
Add 1 cup of sugar to the bowl and combine thoroughly.
Blend 1/2 cup of canned mandarin oranges and add to cream cheese mixture. Combine thoroughly
Assembly:
Turn out cake onto a cake plate or other flat dish and allow to cool slightly. You don’t want it to be too hot, but it needs to be warm so the frosting will glaze a bit while still covering the surface evenly.
Poke a few holes in the cake and pour the cream cheese glaze over the cake, starting in the middle. Allow to drip over the sides.
Decorate the top of the cake with remaining orange slices and serve!
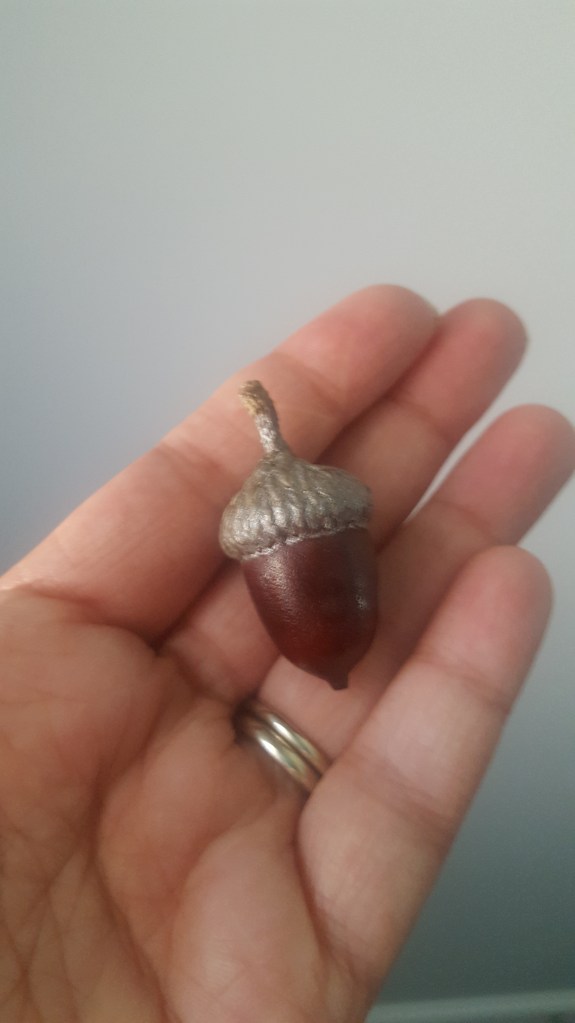
It’s officially FALL! Here’s a cute and easy fall craft you can do with ACORNS – assuming the squirrels haven’t gotten to them all first.
Acorns are popular symbols in jewelry and keepsakes, as well as in folklore and magick.
Acorns are an old symbol of good luck, strength, and prosperity.
Carrying an acorn in your pocket is said to protect you from illnesses.
Placing an acorn on your windowsill under a full moon is said to bring you good fortune.
“Passing the acorn” is an ancient pagan practice of gifting an acorn to a fellow witch at Samhain.
The red tannins from the water of soaked acorns can be used as a dye. Tannin-water from soaked acorns is also anti-septic, anti-viral, and will help with minor burns, rashes, and poison ivy.
Because it’s fall, and nearly Samhain, I wanted to preserve some acorns and place them on our family altar and make a necklace for K and myself to wear! Fortunatley, we live in an area of the country where several types of oak trees are abundant – and the acorns have just recently begun to fall. Preserving the acorns for our decor was super easy, and the necklaces turned out really cute! Here’s how:
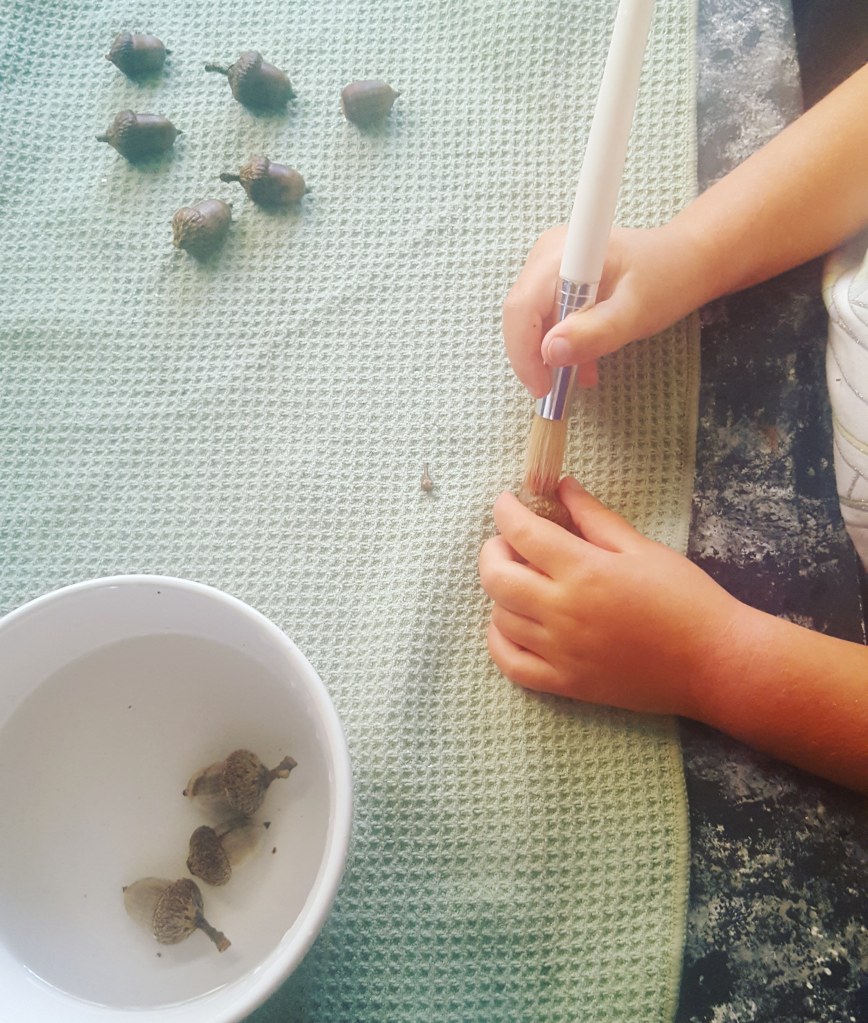
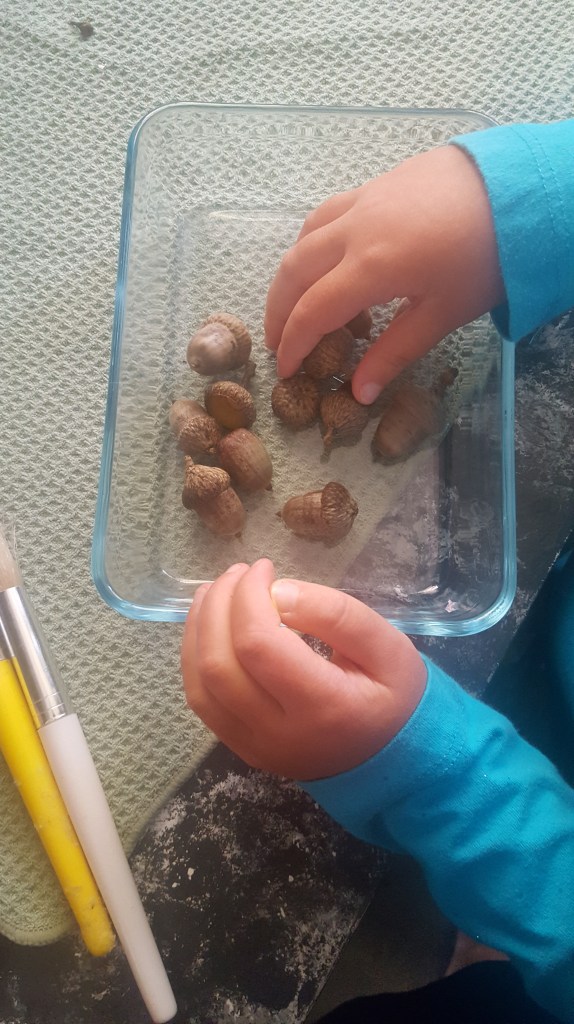
First, collect some acorns – obviously 😉 If acorns are not available where you live, you can get them from Amazon! Make sure they do not have any holes or visible rot/mold. It’s OK if the caps come off, you can glue them back on. Just make sure you have a cap for every acorn!
Rinse the acorns in water and gently brush over each one with a bristly paintbrush, toothbrush, or other soft bristled brush.
Set them on a flat surface to air dry for 1 hour. Then place the acorns (and caps) in a shallow baking dish and place into an oven set to 175F. Allow to remain in the oven for 2 hours, rotating the acorns every 30 minutes. Remove from oven and allow to cool completely.
Once they have cooled you can leave them as is, or you can place a shiny clear coat over them, or you can paint them! I recommend using enamel or acrylics if you choose to pain them.
If you want to make your own acorn necklace, you’ll need:
a needle
an eye pin (or jewelry wire to make an eye pin)
a chain with a clasp, leather cording, or whatever you want to string the acorn on to make the necklace.
an extra o-ring
an acorn, prepared as above. It’s actually easiest if you chose one that has been separated from it’s cap – though you’ll still need the cap!
hot glue gun
Instructions:
Insert the needle straight down into the cap where you want the eye pin to go. Be careful not to put too much pressure on the acorn cap so it doesn’t crumble or crack. Wiggle the needle around to enlarge the hole a bit then insert the eye pin, loop side out.
Trim the eye pin so there is only a little bit inside the acorn (about 3-5mm). Bend this part of the eye pin so it doesn’t pull straight out of the cap.
Fill the acorn cap with hot glue and quickly press the acorn body into the cap. Hold pressure until set.
Place the o-ring through the eye pin and close securely.
You now have an acorn charm that you can place on your necklace chain, cord, or string!
We tried making the charm with 2 holes in the cap at first, but it was very difficult to pass the eye pin through both holes. The second charm we made, I used the method above and it worked wonderfully!
A note of caution, make sure if you paint the acorns that they are good and dry before you wear them as a necklace!! I’d even advise putting a clear coat over the paint so it doesn’t rub off on clothing. My little one treated her acorn as a chewie necklace shortly after we made hers and it resulted in a blue face and stained shirt! (c’est la vie)
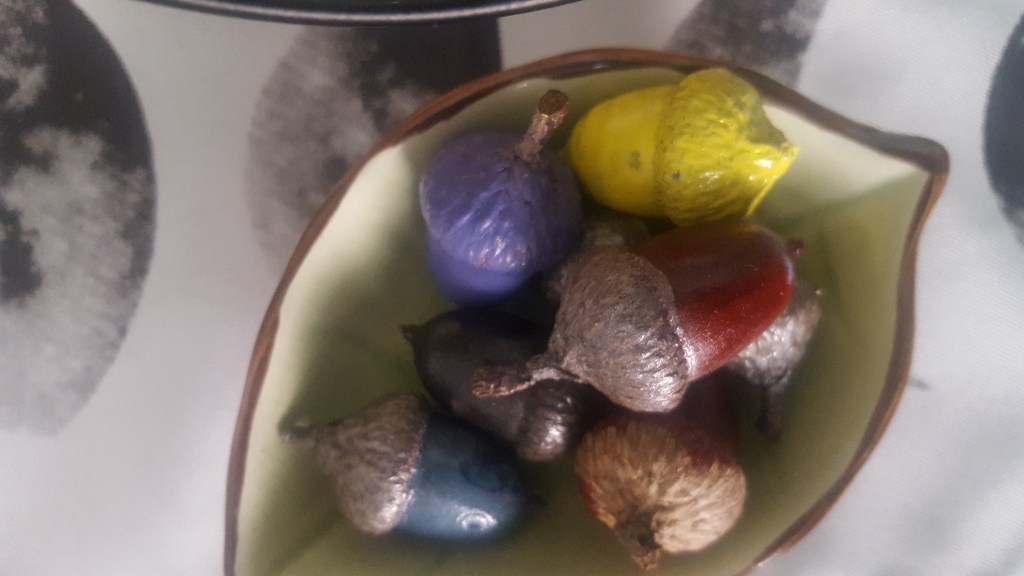
The rest of our acorns are resting in this adorable leaf bowl on our altar!
I’m slightly addicted to colorful acorns now and I imagine we will make this a yearly seasonal tradition! Waxed pinecones are next 😉
For more acorn and fall craft ideas – follow us on Pinterest!
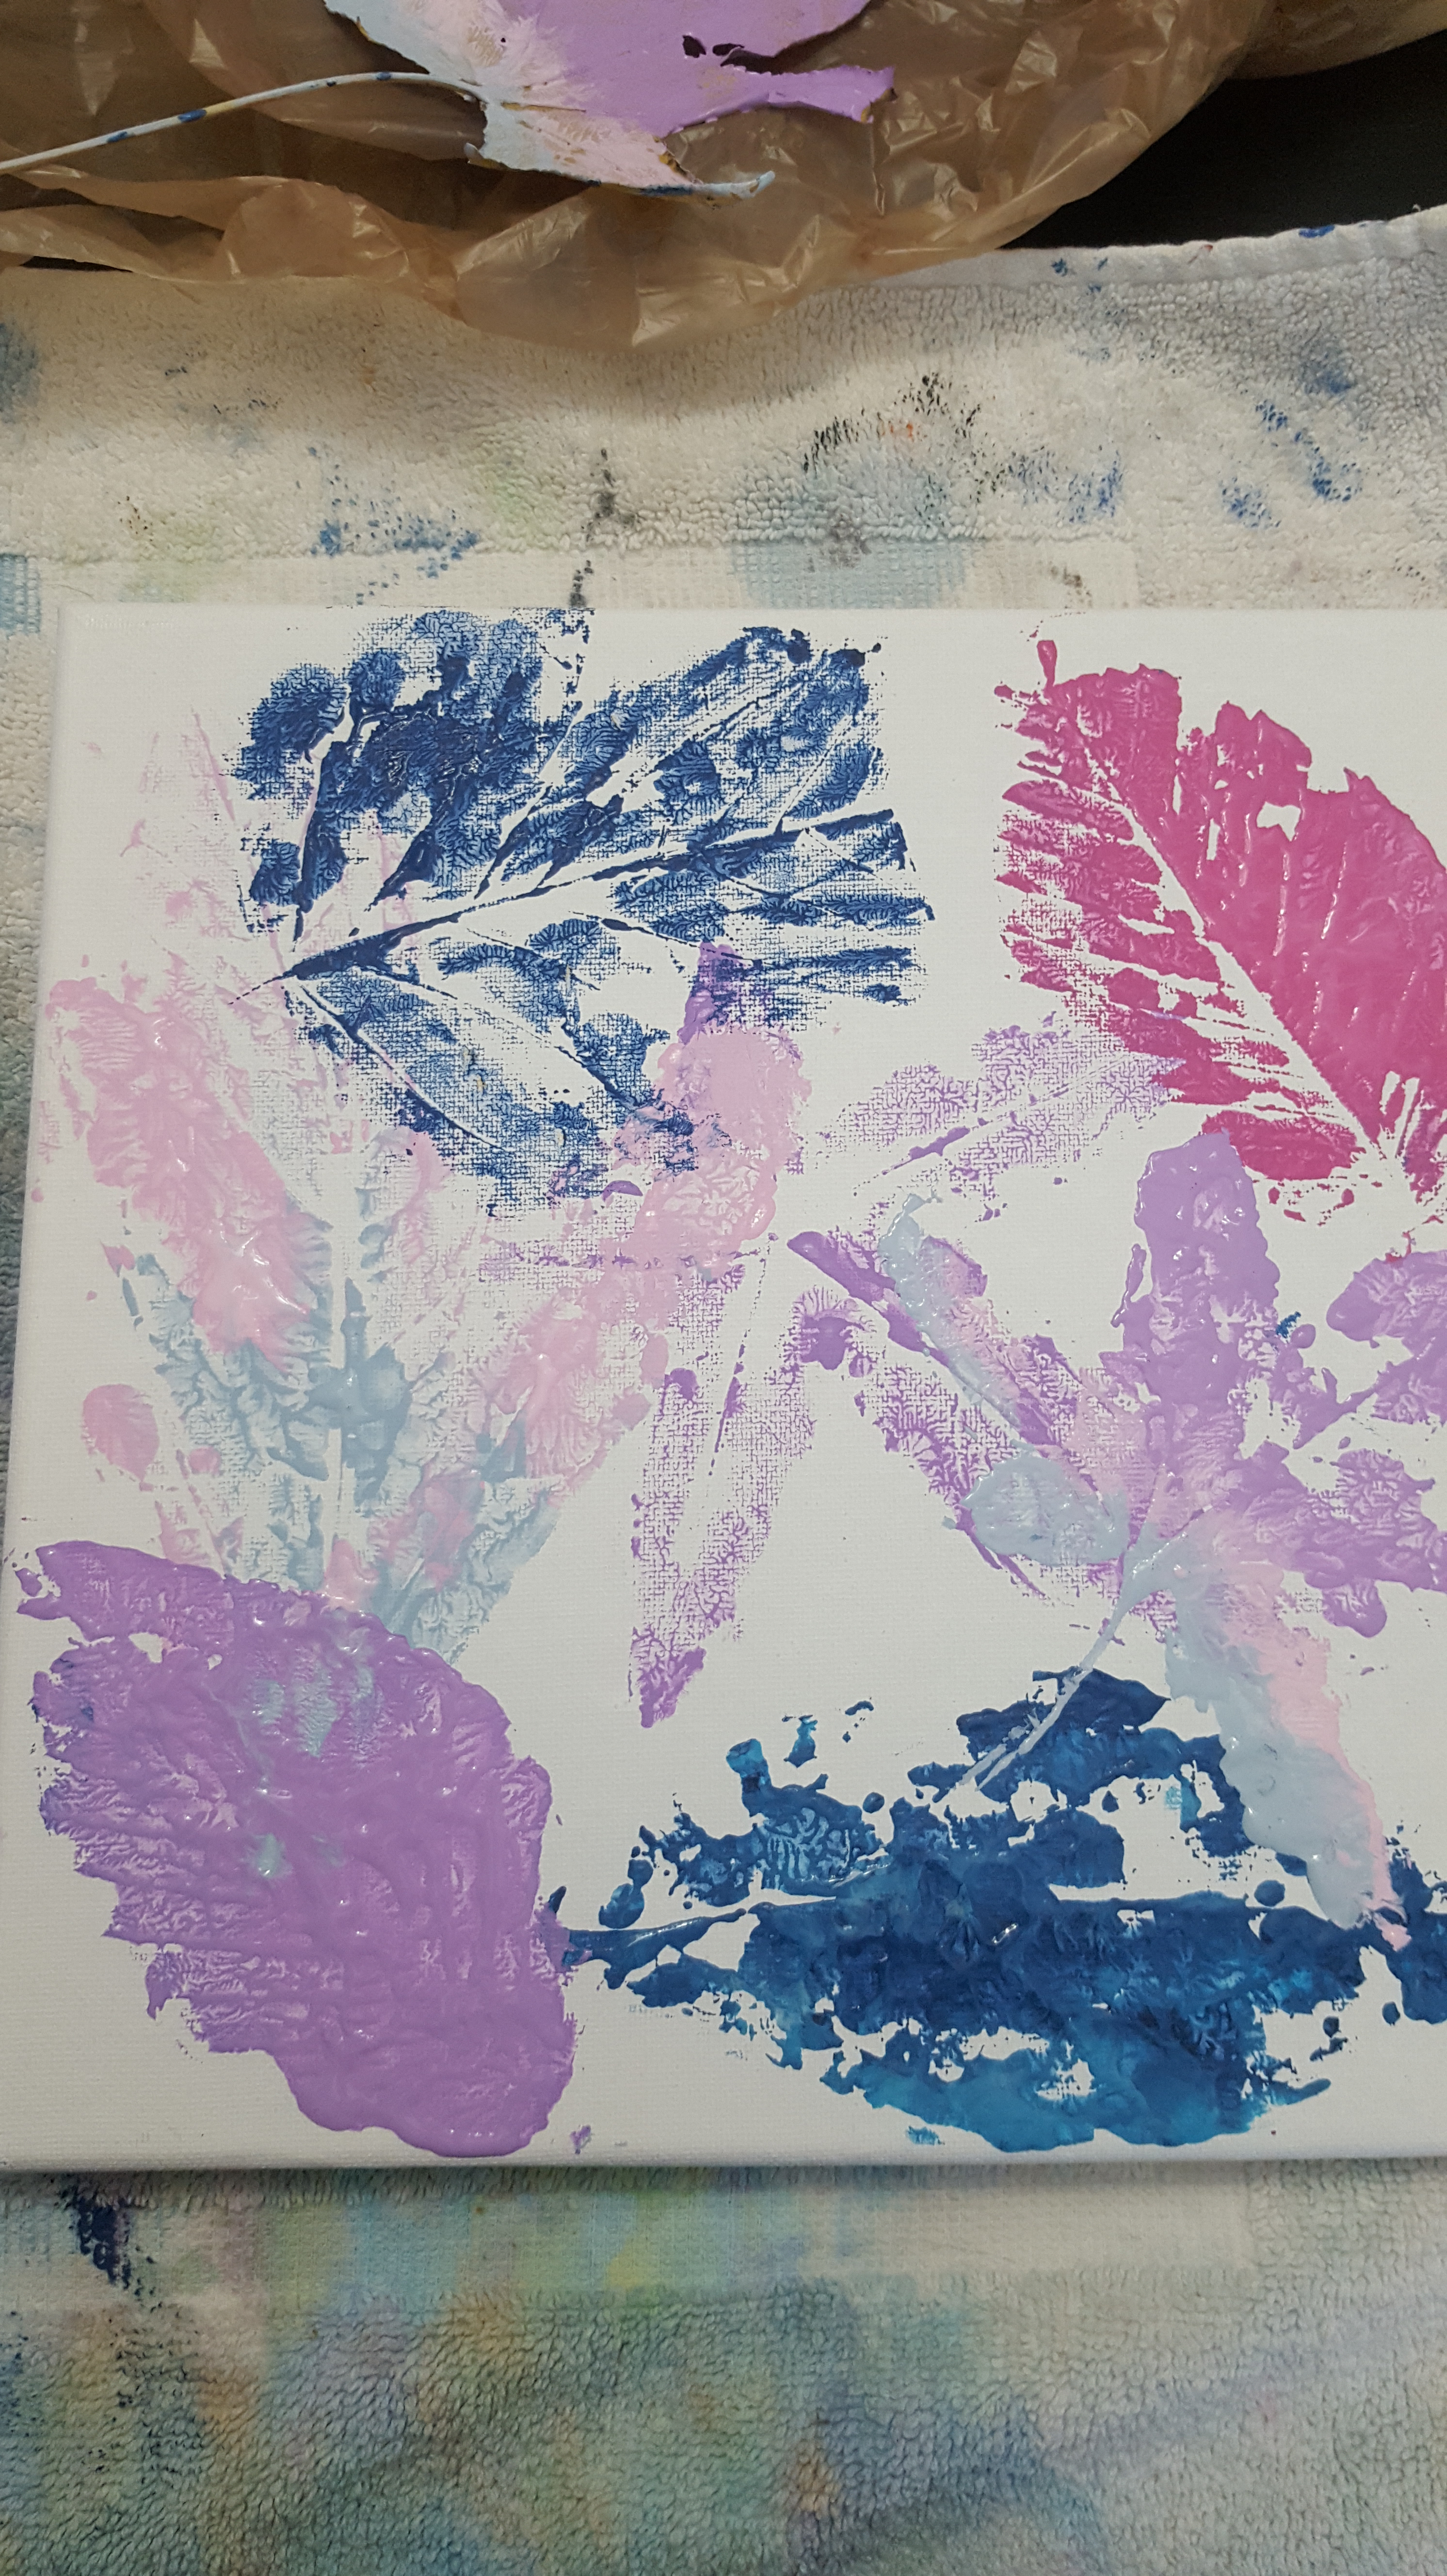
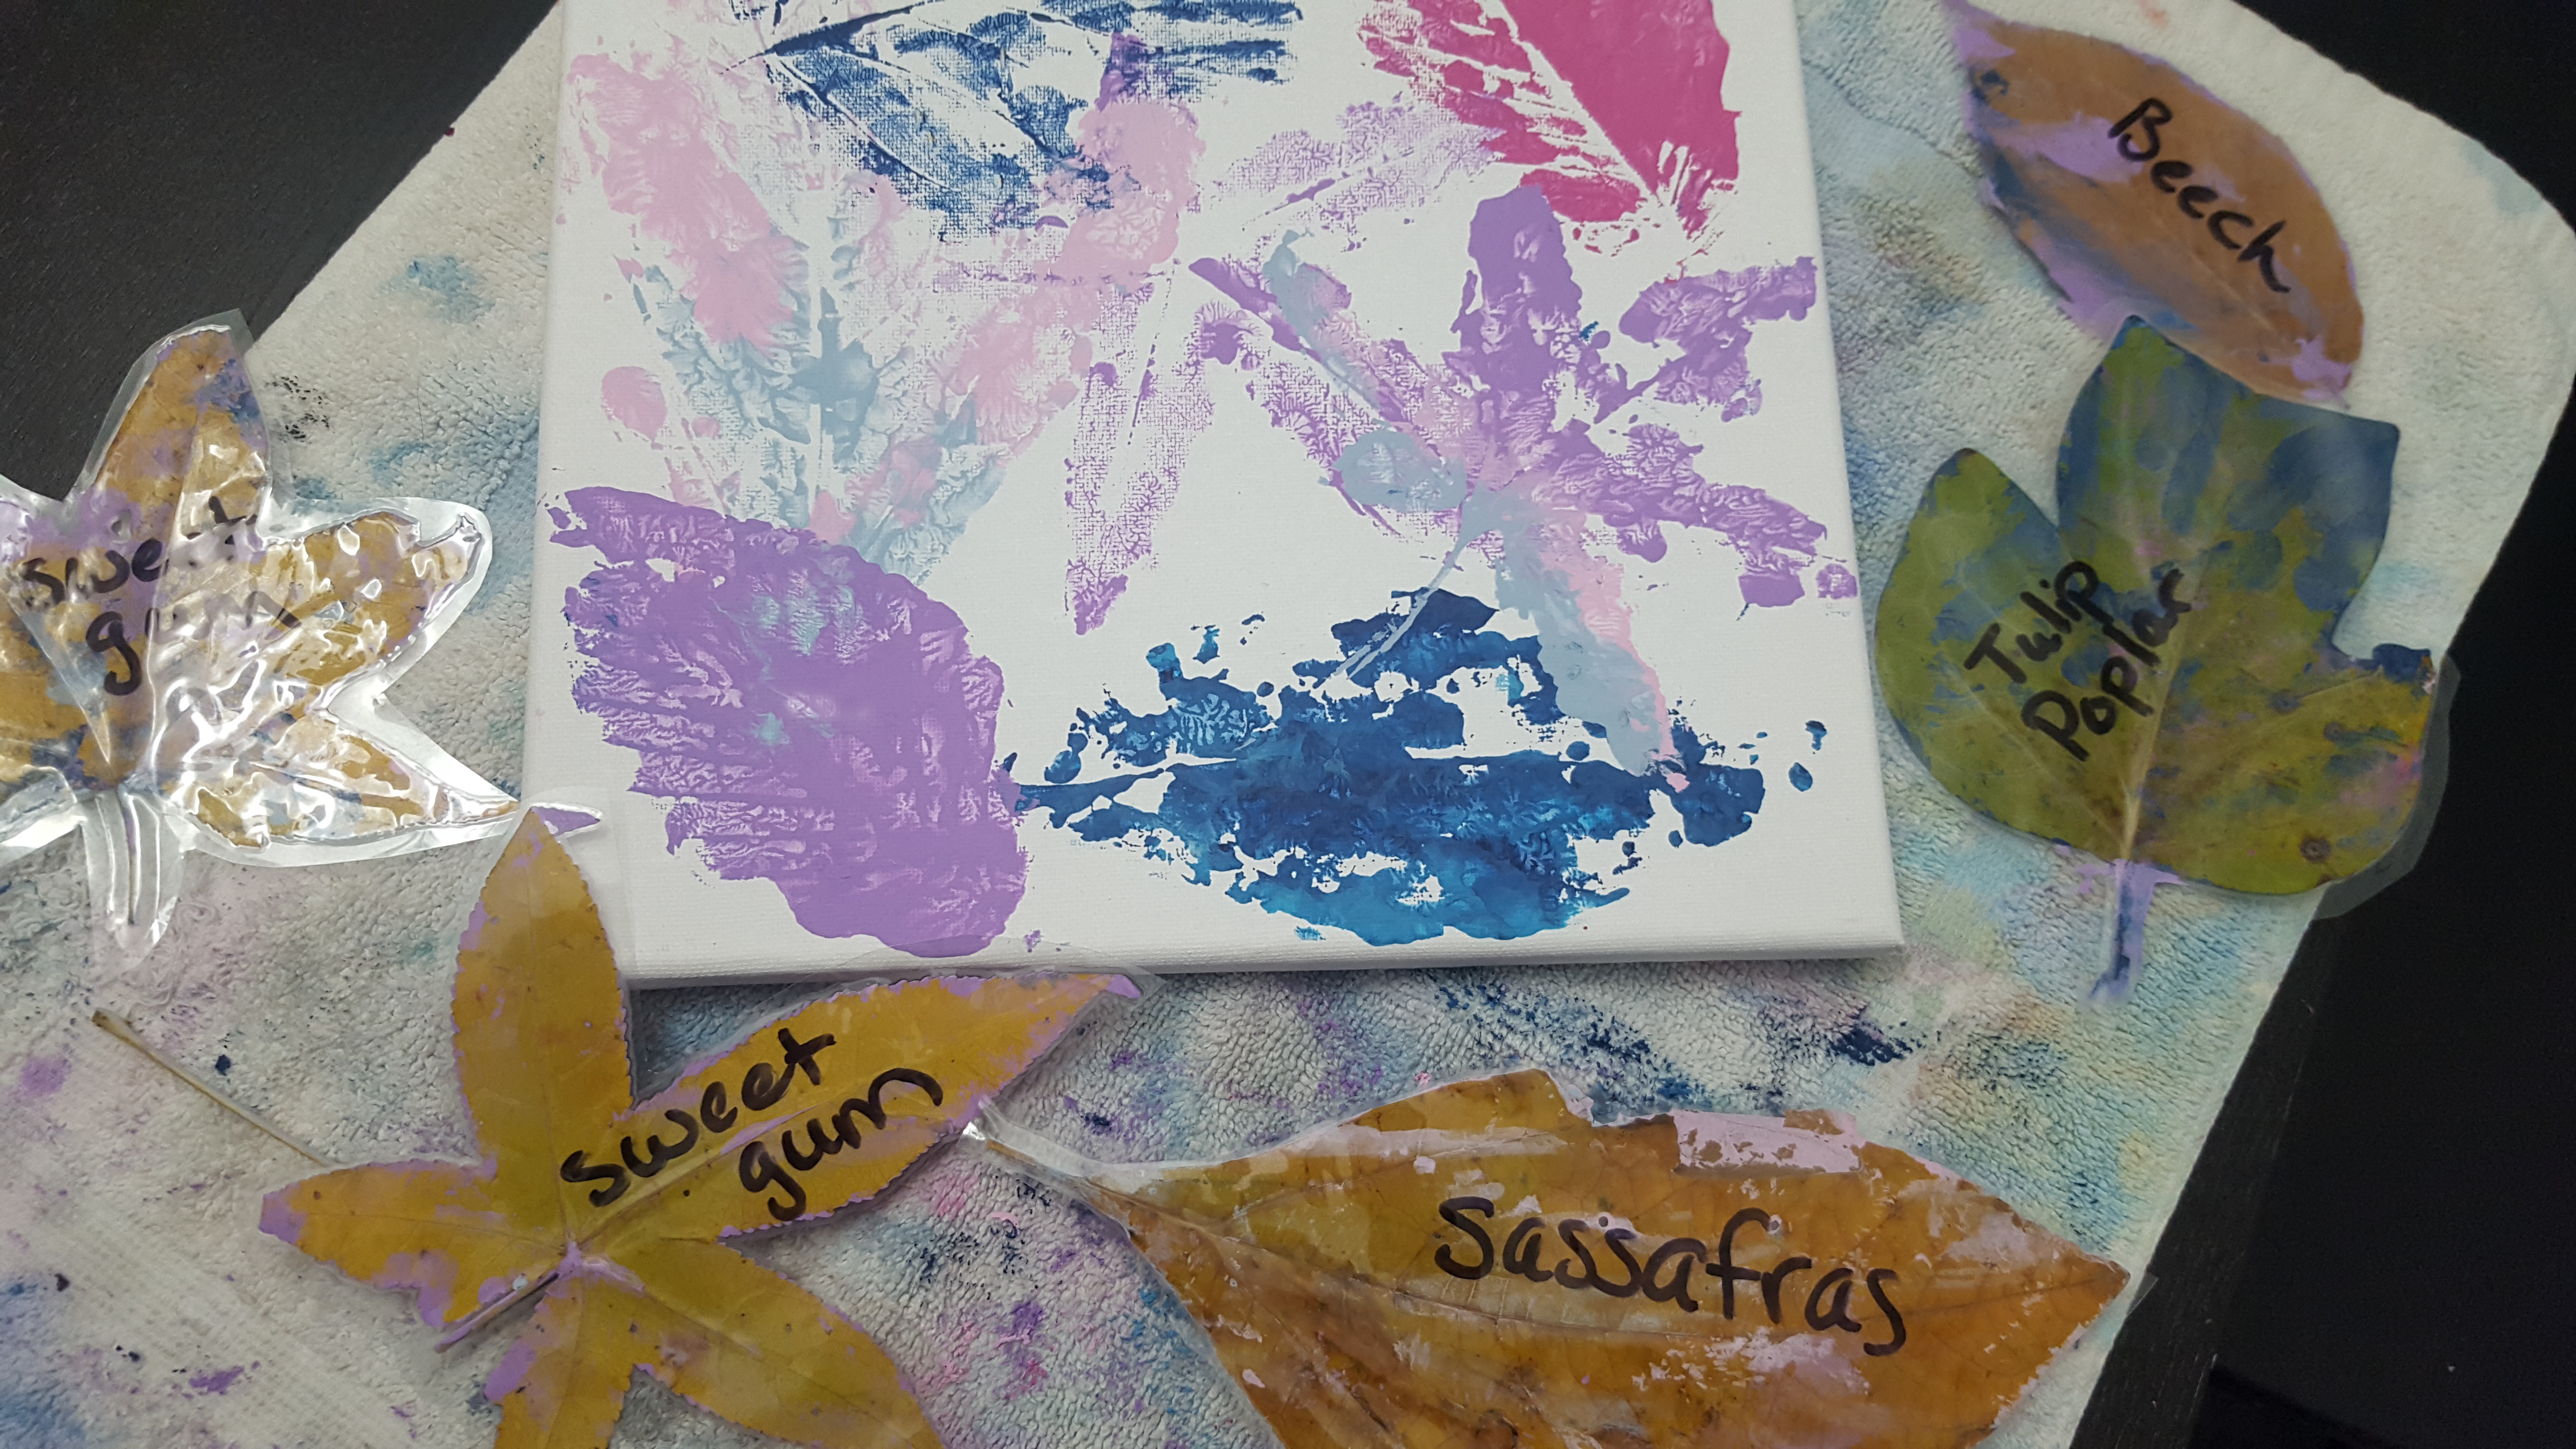
What’s a better way to learn about different trees / leaf patterns than this esay leaf print project?
All you need are leaves of various shapes and sizes, acrylic or tempura paunts, brushes, and a printable surface (we chose a small canvas, but you could also use t-shirts or tote bags!).
We gathered our leaves from our backyard, but you could gather them really anywhere during the fall! Special places or on a nature walk… Try gathering both deciduous and coniferous leaves! Just make sure you choose leaves that arent too brittle or they will break and crumble when you try to press them down.
Once you have your leaves, evenly paint the underneath side of the leaf to get all the vein patterns. You want a thin wet coat, no glops or it won’t show the print very well.
Position your leaf painted side down and lightly press/rub from the stem outward towards the tips, being caregul not to scoot the leaf across the surface of the canvas (or t-shirt, paper, etc.)
Then, gently peel the leaf upward from its stem and voila! You should have a leaf print!
Try painting patterns or multiple colors on a single leaf for more artsy prints. Also, don’t be afraid to let the prints overlap!
Experiment and have fun. Try to identify the trees each leaf came from, talk about the differences you see in the leaf patterns, etc.
Once we were done with our leaves, we let the re-painted and let the leaves dry, then ran them through oyr laminator. We cut out around their shapes and, with the help of Facebook and Google, identified each leaf’s tree and wrote its name on the unpainted side in Sharpie for my daughter’s nature collection (and educational purposes)!
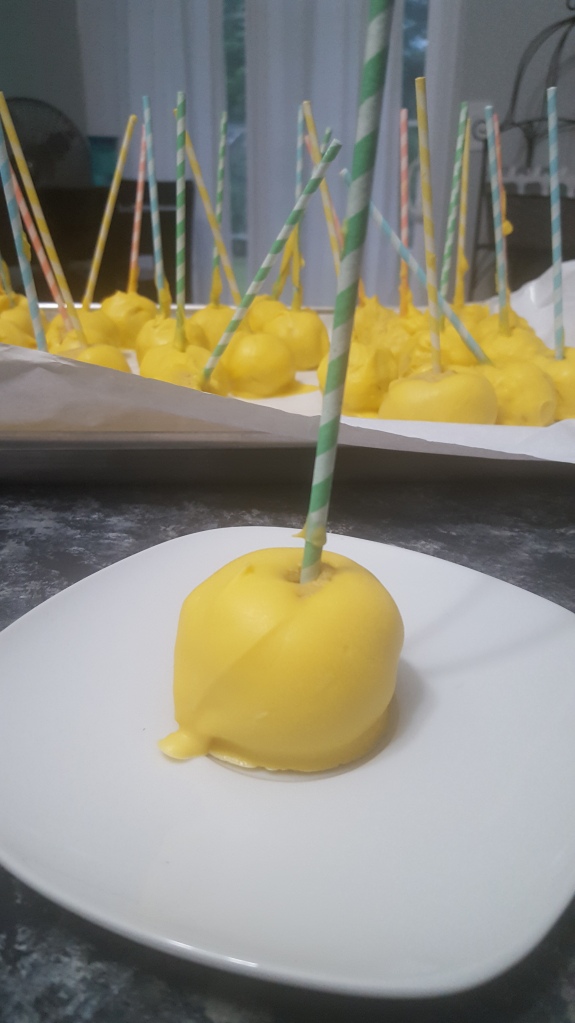
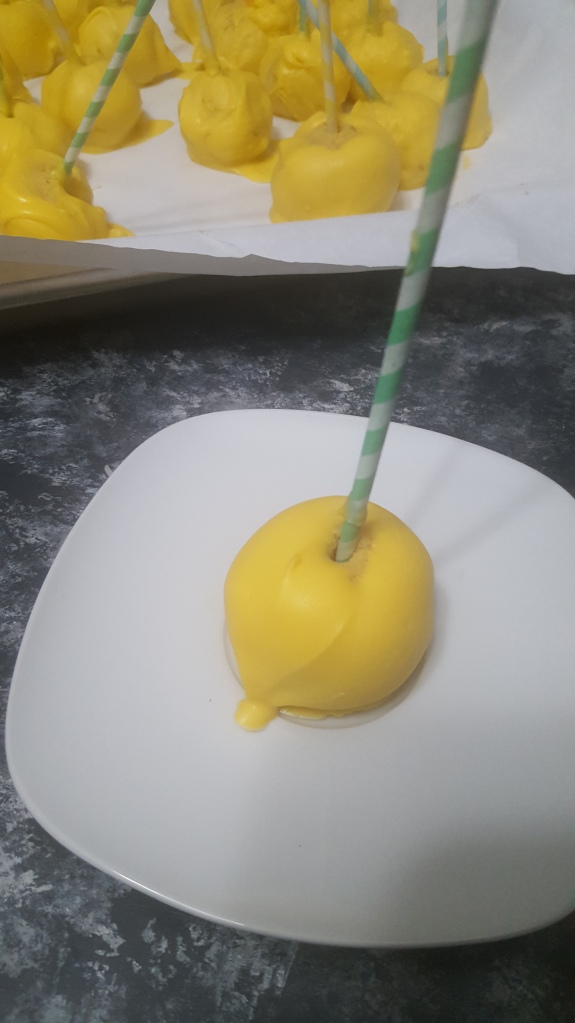
Cake pops have to be the most versatile dessert ever. You can decorate them and flavor them a million different ways. You can leave out the sticks and turn them into “cake truffles” or “cake balls”. They are ready-to-eat in perfectly portioned sphericals and darn it if they just don’t make everyone happy!
I LOVE cake pops. I don’t have all the fancy cake pop makin’ gadgetry – just do a search for cake pop molds on Amazon and you’ll find all kinds of goodies to make your cake pop making experience much more “professional” and supposedly easier too. But I don’t use any of that stuff. Would I like to? Yes. But I don’t really have the space to store said stuff and I really really don’t need any more excuses to make cake pops more often.
If you want to use the gadgetry, by all means, go right ahead! But if you don’t have the fancy tools, you CAN still make yummy cake pops fairly easily! We made these lemon cake pops for summer solstice this year and 5 days later they were all gone!
WHAT YOU’LL NEED
yellow cake mix plus ingredients on box (eggs, oil, water)
Prepare cake batter as instructed and add 1 vial of LorAnn lemon oil to batter. Bake as directed. Be sure to coat your baking pan with oil/cooking spray!!
Allow cake to cool completely then turn out in pieces into the mixing bowl
Mix in icing 1 spoonful at a time until cake is able to be formed into balls. You want the consistency of the resulting “dough” to be moist enough that the cake balls do not fall apart. If you add too much icing, the balls will too soft to stand upright on the sticks – so just ditch ’em! The cake balls will still taste yummy, they’ll just be a bit softer in the middle. 😉
Form the “dough” into 1 inch balls, insert sticks, and place on cookie sheet covered with wax or freezer paper. Freeze for 1-2 hours.
When the cake balls have frozen and are firm, assemble the double boiler (or use the 2 pot method).
Melt candy coating in the double boiler/top pot, over medium heat, stirring constantly to avoid burning/seizing.
Carefully dip each cake pop into the melted coating. Either return the dipped cake pop in a standing position to the wax paper (you will have a flattened “top”) or place pop in a stand. (Tip: Sytrofoam lids, cardboard boxes, and some colanders make easy impromptu stands.)
Place finished cake pops in the refrigerator and allow coating to cool completely.
Eat and Enjoy!
This is a pretty basic recipe. Experiment with different cake flavors and icing combos and add sprinkles or an icing drizzle or even fondant flourishes to make your own special cake pops!
And don’t stress if they don’t turn out perfectly – several of ours had some less than perfect candy coating (I let hubby and the kids dip them), it’s whatever. I don’t claim to be a “Pinteretst perfect” mom, so what you see in our pics is never a doctored up reality 😉 IMO, it’s the experience and memory-making that matters.